Learn How to Replace any Micro USB Port Here
Do at own Risk!!
Title: “Revive Your Nokia 106: DIY USB Charging Port Repair/Replacement Guide”
Is your Nokia 106’s USB charging port acting up or not working at all? Don’t worry, we’ve got you covered! In this DIY tutorial, we’ll guide you step-by-step on how to repair or replace the USB charging port on your Nokia 106, so you can get your phone up and running again.
Why USB Charging Port Repair/Replacement?
The USB charging port is a crucial component of any mobile device, including the Nokia 106. It allows you to charge your phone and transfer data to and from your computer. However, over time, the charging port can become damaged, resulting in charging issues, poor connectivity, or a completely non-functional port. Repairing or replacing the USB charging port can save you the cost of buying a new phone and extend the lifespan of your Nokia 106.
Tools and Materials You’ll Need
Before getting started, make sure you have the following tools and materials ready:
Replacement USB charging port: You can purchase a replacement USB charging port for Nokia 106 online or from a reputable electronics store.
Screwdriver: You’ll need a small screwdriver, such as a Phillips or Torx screwdriver, to open up the Nokia 106.
Tweezers: Tweezers can come in handy for handling small components and connectors.
Soldering iron and soldering wire (optional): If you need to desolder the old USB charging port or solder the new one in place, you’ll need a soldering iron and soldering wire.
Pry tool: A plastic pry tool can be useful for gently prying open the Nokia 106 without damaging the casing.
Step-by-Step USB Charging Port Repair/Replacement Guide
Follow these steps to repair or replace the USB charging port on your Nokia 106:
Step 1: Power off the phone and remove the battery.
Step 2: Use the screwdriver and pry tool to carefully remove the back cover of the Nokia 106.
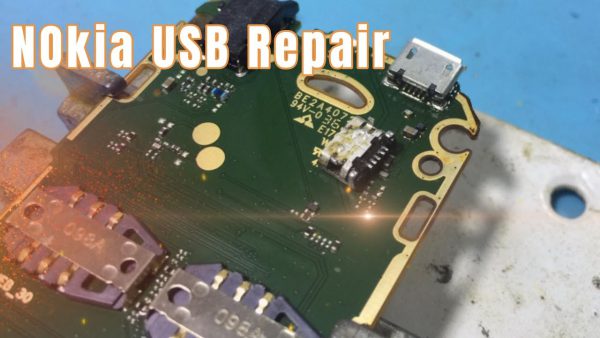
Step 3: Locate the USB charging port on the motherboard of the phone. It’s typically connected by a ribbon cable or soldered to the motherboard.
Step 4: If the USB charging port is connected by a ribbon cable, gently unplug it from the motherboard using tweezers.
Step 5: If the USB charging port is soldered to the motherboard, you may need to desolder it using a soldering iron and soldering wire. Be sure to follow proper soldering techniques and precautions to avoid damaging the motherboard.
Step 6: Once the old USB charging port is removed, clean the area and prepare the replacement USB charging port.
Step 7: If the replacement USB charging port has a ribbon cable, plug it into the corresponding connector on the motherboard.
Step 8: If the replacement USB charging port needs to be soldered, carefully solder it in place using a soldering iron and soldering wire.
Step 9: Double-check all connections to ensure they are properly seated or soldered.
Step 10: Reassemble the Nokia 106 by snapping the back cover back into place.
Step 11: Insert the battery and power on the phone to test the USB charging port.
With these steps, you should be able to repair or replace the USB charging port on your Nokia 106 and restore its charging and data transfer functionality.
Important Tips and Safety Precautions
- Make sure to power off the phone and remove the battery before attempting any repairs to avoid any risk of electrical shock.
- Take your time and be gentle when prying open the phone and handling the components to avoid damaging the phone or other internal parts.
- If you’re not comfortable with soldering, it’s best to seek help
o.