Easy & Quick Guide for PS4 HDD/ SSD Swap
Why SSD instead of HDD?
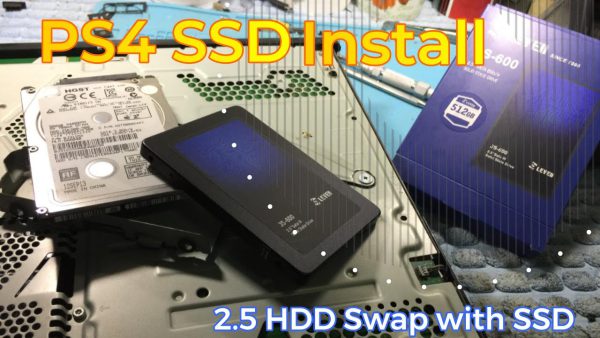
Swapping a hard disk drive (HDD) with a solid-state drive (SSD) in a PlayStation 4 (PS4) can potentially result in improved performance, including faster load times and smoother gameplay. Here’s a general overview of the process:
Backup your data: Before making any changes to your PS4’s storage, it’s crucial to back up your data to prevent any potential data loss. You can do this by using the PS4’s built-in backup feature to create a copy of your games, saves, and settings on an external USB storage device.
Obtain an SSD: Purchase a compatible SSD that meets the specifications required for the PS4. The PS4 requires a 2.5-inch SATA SSD with a maximum height of 9.5mm. Make sure to research and select an SSD that is compatible with the PS4 system.
Gather tools: You’ll need a few tools to open up your PS4 and replace the HDD with the SSD. Common tools include a screwdriver (typically a Phillips screwdriver), a plastic spudger or pry tool to help with opening the PS4, and a USB drive with the latest PS4 system software for reinstallation.
Remove the old HDD: Turn off the PS4, unplug it from the power source, and remove any connected cables. Use the appropriate tools to open the PS4 and carefully remove the HDD by unscrewing it from the mounting bracket or tray.
Install the SSD: Attach the SSD to the mounting bracket or tray in the PS4 using the same screws that were used to secure the HDD. Make sure it is properly seated and secured.
Reinstall the PS4 system software: Create a bootable USB drive with the latest PS4 system software and insert it into the PS4. Follow the on-screen instructions to reinstall the PS4 system software onto the SSD.
Restore your data: Once the PS4 system software is reinstalled, you can restore your backed-up data from the external USB storage device to the SSD using the PS4’s restore feature.
Close up the PS4: Put the PS4 back together by reattaching any covers or panels that were removed during the process.
Test and enjoy: Power on your PS4 and test the performance of the SSD. You should notice faster load times and potentially smoother gameplay.
It’s important to note that performing any modifications to your PS4 may void your warranty, so proceed at your own risk. Additionally, make sure to follow all safety precautions and guidelines, and research thoroughly to ensure that you are using compatible hardware and following the correct steps for your specific PS4 model. If you are not comfortable with performing the SSD swap yourself, it’s recommended to seek professional assistance or consult with an experienced technician. Good luck! 🙂